¶ Wonderland SDK
If your game is using the Wonderland engine, you can use this SDK to implement in-game ads. In-game ad implementation for Wonderland engine requires a few more steps, but don't worry, they won't take too much time.
¶ Installation
Installing the Web SDK is as simple as running the following command in your project's directory:
npm install @heyvr/sdk-ad-wonderland
This should automatically install the SDK and include it in your project. If not, make sure the following 2 lines exist in the project's js/index.js file:
import {HeyVRAd} from '@heyvr/sdk-ad-wonderland';
engine.registerComponent(HeyVRAd);
Now, we're ready to place the ads.
Not using NPM for dependency management?
Simply download the SDK file from here and copy it to thejsdirectory in your Wonderland project.
¶ Placing Ads
To place a fully functional ad in the game, we'll need to follow a set of steps. These steps are:
- Creating a Mesh component
- Creating a new Material
- Attaching the SDK to the component
- Defining collision and capture clicks
¶ 1) Creating a Mesh Component
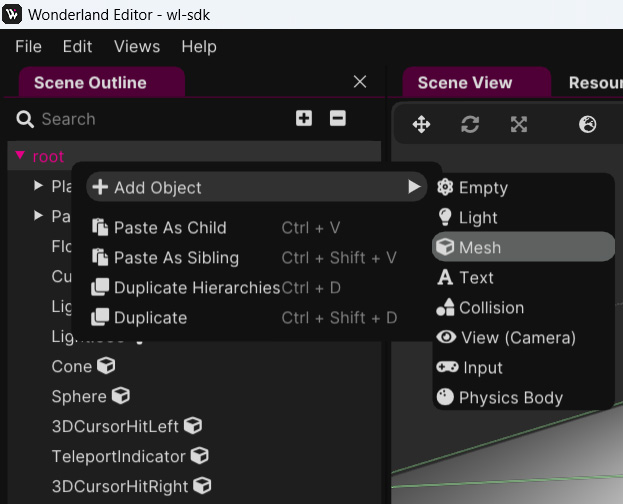
From the Scene Outline pane, right click on the desired component and choose Add Object > Mesh. This will create a new empty Mesh object, which we will render the ad on it.
While the SDK will automatically set the proper aspect ratio for the component, you're advised to properly adjust the Scaling parameters via the "Properties" pane, to improve UX and prevent sudden changes on the screen.
¶ 2) Creating a new Material
Each ad component needs a unique material attached to it. The SDK will target these matarials and render the texture on them. To create a new material, enable the Resources tab via the View menu, and head over to Resources > Materials. Then, click the Create button on the top right corner:

You can set the pipeline to Flat Opaque Textured and also give the material a unique name. We'll name it BannerMaterial in this tutorial:

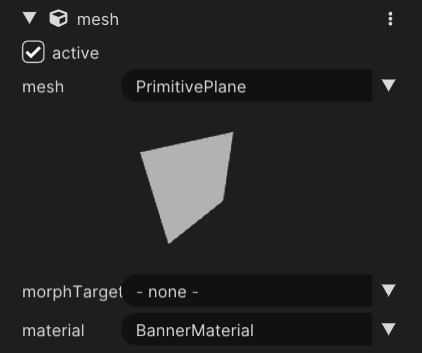
Now, click on the mesh object you've created previously and open the Properties pane. You'll need to set the following parameters:
mesh- Set to PrimitivePlanematerial- Set to the newly created material, BannerMaterial
¶ 3) Attaching the SDK to the Component
Now it's time attach the SDK component to the mesh object, to enable to functionalities. To do so, select the mesh object and navigate to the Properties pane, scroll down to the bottom, and click the Add Component button. You can now choose the heyvr-ad component and add it to the mesh object:
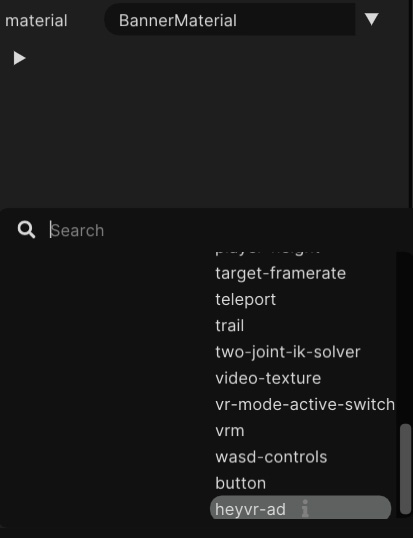
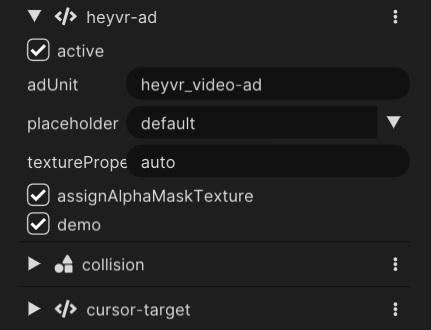
You'll now have a new heyvr-ad component attached to your mesh object. Expand this component and set the the ad unit. We'll also enable the demo option since we're testing locally:
We're almost done! Time to capture user's clicks.
¶ 4) Defining Collision and Capturing Clicks
So far, the ads will be rendered, but they're not clickable. We're going to change that by adding 2 additonal components to the mesh object: The curser-target component and the collision component.
You can add the cursor-target component by clicking the Add Component button again, and selecting it from the list. That's all.
For the collision component, click the Add Component again, choose this component from the list, and add it to the mesh object. We'll have to do a few configurations though:
Since the ads are a flat surface, we'll set the collider to aabb and change the extents values until the boundries fit nicely over the mesh object. In our case, this is how the configuration will look like:
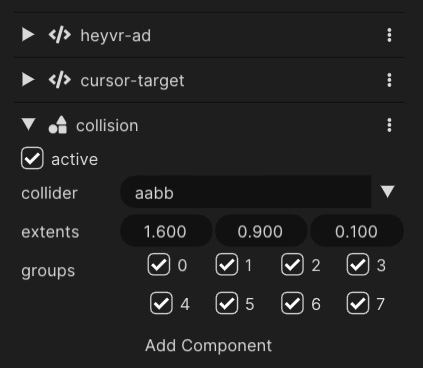
The reason we've chosen these values is that we've previously updated our mesh component with the same values.
And, that's it! Build your project, and run the local server! The ads should now be rendered within your game.